October 14, 2025
November 3, 2025
Every holiday season, Nevada neighborhoods light up with the warm glow of Christmas decorations. While those lights bring cheer, hanging them the wrong way can cause serious trouble for your roof.
Things like nails and sticky adhesives might seem like quick fixes, but they can crack shingles, loosen flashing, or leave small gaps that let in water once the snow starts to melt. Many homeowners look forward to spreading holiday cheer with their decorations each year, making it important to install them safely.
Each year, about 18,400 people in the U.S. end up in emergency rooms because of holiday decorating accidents, many from falls while hanging Christmas lights on roofs or ladders. Along with safety concerns, improper installation can also shorten your roof’s lifespan and can result in expensive repairs if water seeps in under the surface.
However, with a little planning and preparation, you can prevent both problems. Tools like roof-safe light clips and outdoor-rated cords keep your decorations secure and your roof protected through snow, ice, and wind. It’s a reliable way to keep your home looking bright through the holidays and your roof protected when the snow melts.
In this guide, you’ll learn how to hang Christmas lights on your roof and keep your home shining all season long, without causing damage or extra repairs down the line.
Learn Roof-Friendly Christmas Light Installation Tips Contact Us
Hanging Christmas lights incorrectly can leave tiny holes in your shingles or flashing, giving moisture an easy way in. That trapped water can cause leaks, rotted wood, and other costly damage. Improper installation can also create a fire hazard if electrical connections are not managed properly.
Here’s how it happens and what you can do to prevent it:
Using nails, staples, or strong adhesives to hang Christmas lights on the roof can damage your roof’s protective layers. Even small holes can let water slip under the shingles and flashing, breaking down the waterproof layer that protects your home. Once moisture gets in, it can cause leaks, mold, and other costly roof problems.
Hanging lights that are too heavy or pulled too tight can put extra strain on your roofline. That pressure can loosen shingles, shift flashing, or even bend your gutters. Leaving decorations up for months only adds to the stress, which can cause early wear and roof damage.
When learning how to hang Christmas lights without damaging your house, it’s best to use lightweight strings and even spacing to avoid excess tension.
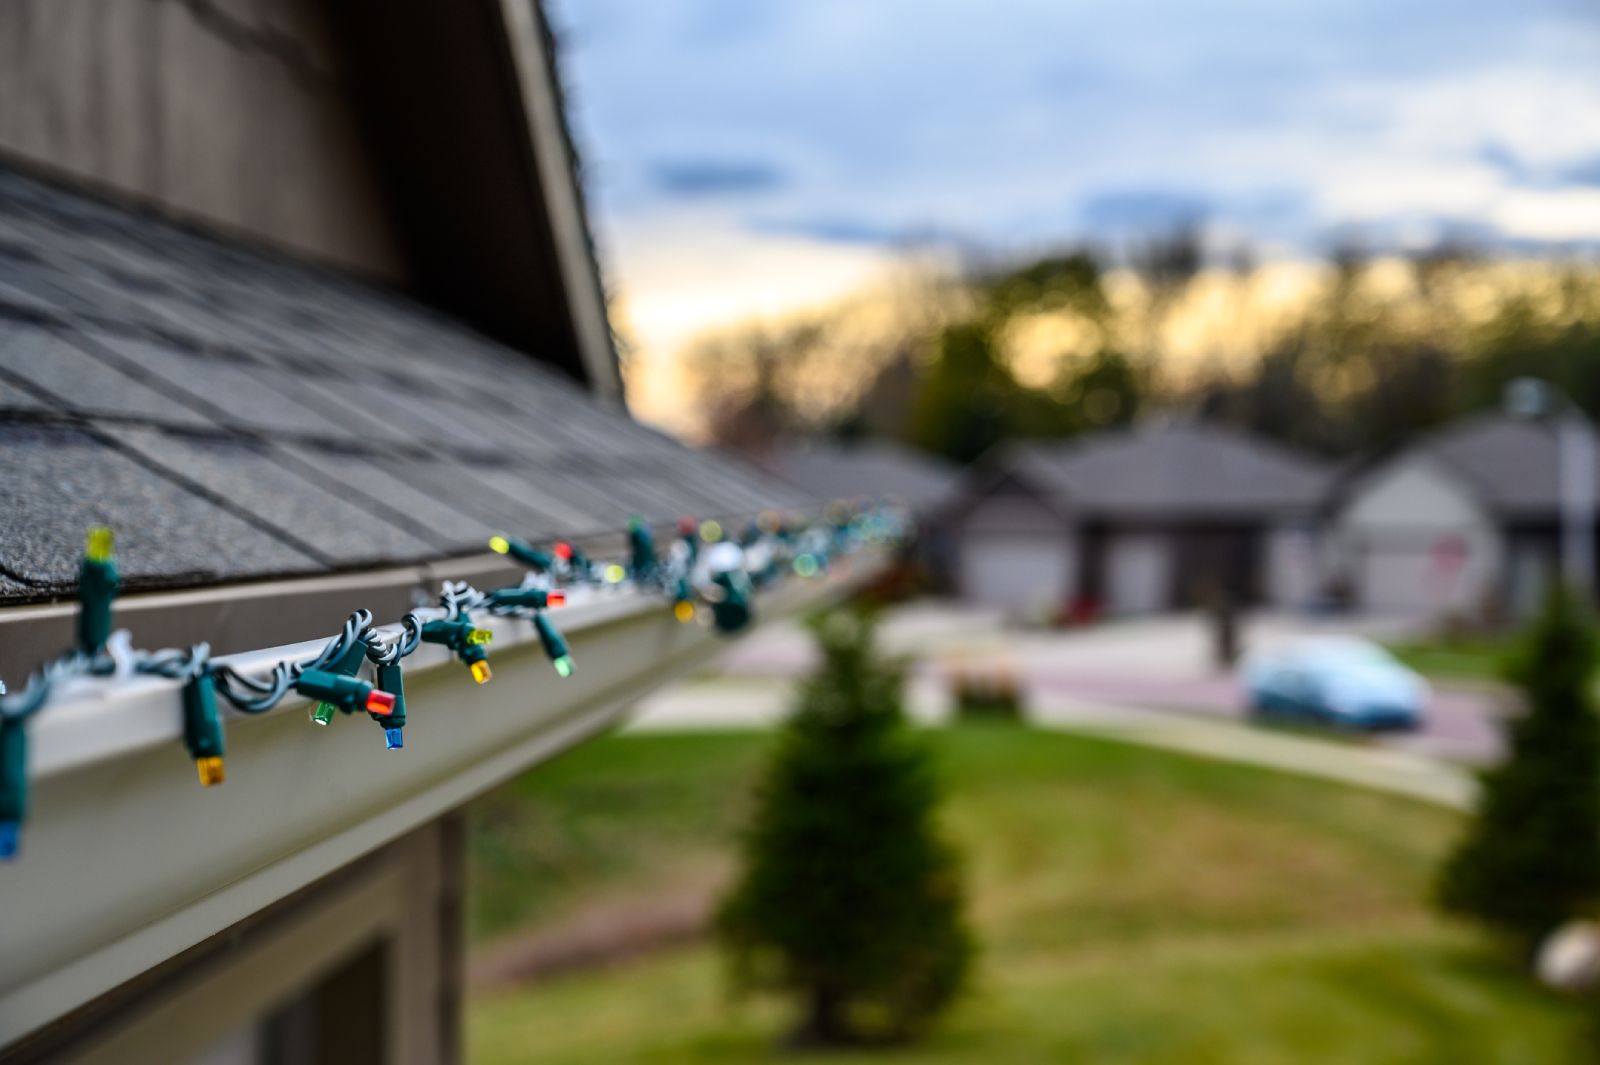
Light clips for roofs and gutters let you hang your Christmas lights securely without causing any damage. They attach easily without nails or glue, so your shingles and flashing stay intact. Most clips are made from tough, weather-resistant plastic that holds up through wind and cold and can be reused year after year. Plastic light clips are particularly effective because they are durable and do not damage the roof.
You can also install Christmas lights under gutters for a clean, professional look that won’t harm your roof.
Protecting your roof starts with using the right tools from the start. With a good setup, you can decorate without risking roof damage.
Request Professional Installation & Keep Roof Safe Get Started
A great holiday display starts with having the proper tools on hand. Before you climb the ladder, take a moment to gather everything you’ll need to hang Christmas lights on your roof safely and keep your shingles and gutters protected.
Nails and staples pierce shingles or gutters, creating small holes that let water enter and cause leaks or rot. Light clips for the roof are a better alternative. They snap on without damaging your roof, and keep your lights secure through wind and cold.
Not all light clips work the same way, so it helps to know which type fits your setup. Shingle clips slide under the edge of shingles without lifting or damaging them, while gutter clips hook directly onto the gutter lip for a snug hold.
Universal clips can do both, which makes them handy for homes with different rooflines. They are designed to stay attached to the lights or the home’s surface, making installation and removal easier and less dangerous.
For a cleaner look, some homeowners like to hang Christmas lights under gutters, keeping the bulbs protected and neatly aligned.
Use a ladder stabilizer for balance, outdoor-rated extension cords for durability, and weatherproof timers to control your display. Make sure you stand securely on the ladder, and never stand on the roof unless necessary and with necessary precautions.
Always wear protective gear like gloves and sturdy shoes, and have someone nearby to help with the ladder. Taking these precautions helps you hang Christmas lights without damaging your house or risking injury.
Once you have the right products and tools ready, the rest is simply about careful planning and steady work. Careful preparation now prevents unnecessary problems once your lights are up.
Schedule a Roof Inspection After the Holidays Call Now
With the right setup, you can create a bright, festive display without harming your shingles or gutters. When installing Christmas lights or installing lights on your roof, always use recommended precautions and never hang lights when snow, ice, or wet weather is visible on the roof or ground.
Follow these simple steps to hang Christmas lights on your roof safely and keep it protected all season long.
Measure your eaves, gutters, and roofline before you start hanging the lights so everything lines up evenly. As you plan, consider placing a bulb at the peak of the roof to create a balanced and visually appealing display. Go with LED lights instead of traditional bulbs; they use less energy, stay cooler, and put less stress on your light clips for roof edges and materials.
Including trees in your holiday displays can add extra visual interest and help create a more dynamic and professional-looking arrangement. Planning makes sure your Christmas decoration looks clean and balanced once they’re complete.
Before hanging any lights, make sure the roof edges are clean and in good condition. Remove leaves, dirt, and other debris so the clips can grip correctly without slipping. Check your shingles and flashing for any cracks or loose spots, and take care of small issues now to prevent leaks or damage later once the lights are up.
Also, look for areas where the sun may have faded shingles or previous light installations, as sun exposure can harm both the appearance and durability of your roof and holiday lights.
Use light clips made for roof edges or gutters to hold your Christmas lights in place. For icicle lights, choose special clips designed to keep them hanging straight and secure. Space them evenly so the lights stay straight and don’t sag.
As an alternative to roof installation, you can wrap lights around railings using clips for a festive look. For a cleaner look, try hanging Christmas lights under gutters to keep the bulbs protected and the setup looking neat.
Position extension cords along walls or eaves instead of across shingles to prevent trapped moisture. Plug lights into outdoor-rated outlets with weatherproof covers, and use timers or smart plugs for automatic control.
Make sure to connect all light strings properly, checking that each wire and all wires are not damaged before installation. Whenever possible, plug all light strings into the same outlet to get synchronization. Don’t overload circuits or connect too many light strands, as it helps to minimize the risk of electrical hazards.
With these steps, you can hang Christmas lights without damaging your house or putting stress on your roof.
Every roof is built a little differently, and those small differences can change how your lights should be installed. Understanding your roof’s material helps you decorate without cutting corners or endangering yourself.
Different roofing materials require different installation methods. It makes sense to match your installation method to your specific roof material for the best results. Knowing how to attach Christmas lights to the roof based on your material helps you keep your decoration in good condition without causing damage.
If your home has asphalt shingles, use light clips for the roof that slide gently under the edge of each shingle without lifting or bending it. These clips hold the lights firmly in place while protecting the shingles and the waterproof layer underneath.
Metal roofs need a slightly different setup. Magnetic clips or edge-gripping clips work best because they attach firmly without the need for drilling or glue. They hold up well in windy conditions and come off easily after the holidays without leaving scratches or marks behind.
If your home has a tile roof, don’t attach lights directly to the tiles; too much pressure can cause them to crack or chip. Use plastic gutter clips to hang your lights from the roof edge or gutters.
Alternatively, for attaching lights to nearby brick, stone, or unpainted concrete surfaces, you can use hot glue applied with a hot glue gun. Just be sure to test a small area first to make sure that the surface is suitable and won’t get damaged. This approach protects the tiles while keeping your lights secure and evenly spaced.
For steep or elevated rooflines, it’s safer to hang your lights along the gutters or eaves rather than the higher roof sections. This placement gives your display a bright and festive look while keeping the installation simple.
Avoid walking on steep roofs whenever possible, as walking on the roof can be dangerous and should only be attempted with complete safety measures or by professionals.
When used correctly, Christmas light clips don’t damage shingles or other roofing materials. The key is to match the clip type to your roof and throw away forcing attachments that could cause cracks or punctures.
But even with the right tools, small mistakes can cause problems down the line. Taking a few extra minutes to double-check your setup keeps your lights secure and your roof in great shape all season long.
Even with the best intentions, it’s easy to make small decorating mistakes that can result in roof damage or electrical hazards. Taking care during the installation and removal of your holiday lights can help you spend less on repairs and replacements.
As we mentioned, using nails, staples, or other sharp tools to hang Christmas lights on the roof can puncture shingles or gutters and let water seep in. Instead, use roof-safe light clips as they hold lights firmly without leaving a mark.
Also, don’t twist the cords when installing or removing them, as it can cause kinks and damage the lights' appearance and functionality in future years.
Tightly stretched light strands can place unnecessary tension on shingles and gutters. This stress can loosen materials or cause them to bend. Leave a slight slack between clips to prevent strain and keep lights evenly spaced.
Plugging too many light strands into one outlet can overload your electrical system and trip breakers. Always check the wattage limits listed by the manufacturer, and stick to outdoor-rated extension cords that can bear the load.
It’s easy to forget about light clips once the holidays are over, but leaving them up can cause problems later. Moisture and debris can build up under shingles and gutters, resulting in corrosion, mold, or roof deterioration.
Take some time to remove all clips and cords once the season ends, and store your lights and clips in a dry, organized place for next season.
Low-quality clips can crack in cold weather or lose grip over time. For best results, use UV-resistant plastic clips made for winter use; they stay flexible in freezing temperatures and provide a long-lasting hold for Christmas lights under gutters or along shingles.
The safest method is to use light clips for roofs made for shingles and gutters. These clips slide under shingles or hook over gutters to hold lights securely without creating holes or damaging roofing materials.
When used correctly, Christmas light clips grip the edges of shingles without puncturing or cracking them. They provide a firm hold while keeping your roof and home fully protected.
Christmas lights under gutters can look clean and professional when installed with the right gutter clips. These clips keep lights in place and prevent contact with your shingles or flashing.
To hang lights on shingles safely, use shingle clips that slide under the shingle edge. They hold lights firmly in place without adhesives, nails, or hooks, and can be reused year after year.
Your home should shine bright for the holidays, sharing the Christmas spirit with your neighborhood, without putting your roof at risk.
Before you climb the ladder, take a moment to check your roof for loose shingles or signs of wear. If you’re not comfortable working at heights, it’s always best to call a local roofing professional who can do the job well.
If you need help preparing your roof or installing your holiday lights safely, contact us at Mountain Vista Roof Systems. We work with homeowners living in Reno, Sparks, Carson City, and the surrounding Northern Nevada areas.
Our team will make sure your roof’s in great shape, so you can hang your lights without worry.

